
Leanne Stone
Year1 FMP
my first video edit
The first step in my production stage was bringing together the footage I had filmed. I wanted to create a rough template to see how long my film would roughly be and the overall picture and feel to my film. This would allow me to know my focus points and what I need to figure out when it comes to cinematography. I gathered all my clips and created this in Premiere, which I will be using as my main file to link my after effects files to.
I found editing quite simple, I found a good technique of importing shots into After effects as I came to that point in the story. Whilst editing I found I was using a lot of shots that I thought would go to waste due to focus issues or lighting in the best shots from that scene. This spare footage proved very useful. I used text to portray scenes I couldn't show yet, and found myself struggling with timing a little without any audio to work to.

Overall, I am happy with the outcome of the first edit. It's not perfect but I don't feel that was it's purpose. This video shows the general template for my film, I am happy with some of the flow of this. I feel a lot of the film flows nicely from shot to shot and it looks like a continuous movement. However I do feel there are some moments I will try and make look a little smoother, this may be difficult however, considering the lack of footage to carry that scene. Furthermore, I am happy with my diverse range of shot choices and how I have used all the different shots I captured to solve any technical issues I'd had, there are still some focus issues at the start but I will try and resolve these when I next refine the video. From making this video, I can clearly see what I need to do next. I need to first of all work on how to create the sped up part of my film and how to darken the quick snippets of the figures features in the flash forward. I also need to add in some dialogue temporarily to get the right timing as I feel this was made very difficult from having little structure of how the film actually should move along. In conclusion, this is a good starting point to start editing and producing the visual effects and video editing in my film.
refining my video edit
The next step I felt was refining the original video edit so I could jump into VFX and audio confidently. This will include making my sped-up scene, adding in any fade outs, checking timing with temporary dialogue, editing my flash-forward and checking if any colour grading is needed.
refining the flash-forward
The first thing I wanted to do was edit the flash-forward as I had a clear vision of what I wanted to do. I started by experimenting with this and then found it quite easy doing the rest. Below is the final result of editing my flash-forward.
final result
First of all I wanted to practice how I was going to create a darker effect. To the right is the before and after of my practice. This was successful as I now knew how to do this on my actual footage and what I could further look for. More about that experiment is on my experimental research tab.
editing
The original footage together before editing
After figuring out how I would do this it was quite an easy, similar process for all the short shots. I started by adding a brightness and contrast effect. I increased the contrast to show the difference between the darker and lighter tones, I also decreased the brightness to create a darker tone to the whole piece. I then created a mask around the feature I was trying to portray, I feathered this mask and pulled it into the figures features, so there wasn't such a solid line from where the mask meets the figure model. After I positioned this well, I added a colour offset effect to the video. The general rule for this was setting the red phase value to -28, then adjust it according to the colouring of each individual shot. This was generally the rule I went by which slightly changed depending on which video I was editing. I then after editing all the footage edited the timing a little, doing the final little touches.

When editing the scenes where the figure was moving, I had to try a few more tactics before getting it right. I first tried blacking out the edges of the shot, then feathering this to see if I could isolate the centre and have the figure walk across the scene. I then decided to try the same method as before with 2 masks and keyframing them. This worked better, however I struggled with the lighting and had to feather and darken this mask a lot more. I did this same thing when dealing with the arm swing. With regards to Max moving across the screen, I simply added a color offset to create the cool blue all the other shots had.

Overall, I am mostly happy with how the flash-forward has turned out. I am extremely happy with how I was able to edit each shot, looking at the original and then looking at the edited version it serves the purpose I wanted it to. I like how I added a cool blur tint, giving a colder edge to the scene, I also like the tones and contrast between the different shades of black. I feel I will be able to gradually improve and refine my film as I add the other visuals surrounding the flash forward, including the blast, and also as I add the visuals. This is because I feel the biggest part of making this intense flash-forward effective will be the audio. The flash-forward scene wouldn't be perfected until the audio fits perfectly with it as well. Furthermore, I can see a bright frame flash when looking at the feet. Currently, I am torn whether to cut this down a little to continue the darkness or if it adds a nicer transition from the figure to Max turning around, however I feel this would come with refining everything else as well. In conclusion, I am happy with the state of flash-forward as of right now.
editing the sped-up scene
The next major scene I had nothing for was the sped-up scene. This was very unfamiliar territory for me so I had a lot of messing around to try and find out the best way to present the increase of time. I felt creating an overwhelming sense of time passing would help portray this, if the clocks were not only ticking but moving around, it presents a larger sense things going and moving quickly. Below is the finished scene as of right now.
To begin editing, I wanted to set the base footage I had in the speed I wanted. I knew about the time-stretch tool, however wouldn't know how to speed up and slow down the same video without cutting it up. Therefore I learnt about speed ramping. This allowed me to select my frames and choose how quickly I wanted the footage to get to that position. This allowed to me to speed up my footage at certain points. I used this on the footage of Gemma making a drink and on her sitting on the couch, I used color balance to adjust the hue and saturation and also adjusted the contrast and brightness as it was too light, I now needed the clocks to show time passing.
I had two ways of thinking about doing my sped-up scene. I first tried having the clock come diagonally from the top right of the shot and moving to bottom left, however this movement felt unnatural and too forced on the scene. I needed something that showed what my character was doing and a transition into the next room that felt smooth, as I hadn't filmed her walking through the hallway. Therefore I took all my footage of the clock and used time-stretch so it took up 1% of the time it took before hand. This was fast enough and allowed enough time to fade the clock in and out. I took the recording and created a mask around the clock, I feathered this and scale and positioned to where I wanted the particular clock. I started with the middle clock and positioned the others accordingly. I also decreased the saturation as I had a problem with the camera, giving a yellow filter where my living room is grey and silver. This worked well. I tried to fade them in and out at different times to creates another sense of hustle with the speed-up. The only difference with the centre clock was to try and create the transition I wanted. I scaled the background up as much and the same time I scaled the clock up to create a camera movement, moving into the the scene. This worked well giving a unnoticeable transition into the next scene. I faded out this clock and this made the transition more natural then the first idea I had.

Overall, I am happy with what I have achieved so far with this. I like the way the clocks fade in and out of the scene as it creates a sense of hustle and business. I wasn't completely sure how to do this in the beginning but I think the transition is really smooth. Furthermore, I like how you can see the character moving and working in the background, it adds more for you to look at and view, and once with the audio being full and busy it'll be a cool effect. On the other hand, this isn't the final cut as I want to do this when I've done the bulk of effects and edits. I may try and do dome color correcting here and also change the speed of the end so it fades in nicer to her looking up at the clock as the sudden stop in sped-up time feels immediate and unnatural. However, I am quite happy with this so far, it just needs some final touches in the end.
The phone drop
The next smaller effect to think about was when Gemma drops the phone after being electrocuted. I was unsure whether or not to edit it. This is because I wasn't able to get the footage of the phone being dropped from a smaller height due to the fear of damaging it on the hard patio. Originally I wanted to edit it so it appears as if it falls and then hits the ground from a bigger height, however I couldn't get the footage of the phone falling from a smaller height. Therefore I created quick footage of the phone falling to the patio, however after viewing it it seems too quick and all over the place to keep in. Below is the version I have as of right.
Editing this was simple. I created a mask of the phone sat on the pavement and then keyframed the phones position so it comes down the screen. I added motion blur and played around with the time it took for the phone to come down, then it was just about putting it in the sequence.


Overall, this effect is okay, I just feel it's a little too short and therefore might not fit. I am not certain whether this will stay in or not due to the timing of it. I need to play around with this when refining the video, I may keep, get rid of it or re-film and edit this. However, I feel my editing process was good and it looks good.
small adjustments
Before getting heavily into the Visual effects in after effects I wanted to review my current progress and make any adjustments I feel after watching my rough cut back a couple of times. Below are the small adjustments I made in this process. This cleaned up my rough cut, refining a few of the scenes a little further.


The first thing I knew I wanted to do was try colour correction on the scene where my characters were talking in the room. I started by adding a brightness and contrast effect, decreasing the brightness to give the darker night feel. I then added the colour balance, using the red and the green highlights to create a warmer tint, emphasising the warm effect the reflector already created. I copied and pasted this across the first scene, editing the tint slightly as she leaves the room. Whilst focusing on this I also messed around making the other night scenes a little darker.

The next small task I had was fixing the footage I had of the clock going past 11. It was originally very shaky due to being hand-held footage. I used the warp stabiliser effect, experimenting with different smoothness amounts. I also messed around with the different stabiliser settings. You could choose between what to stabilise. Scale, motion etc. I used this effect on a clip of Gemma walking towards the patio door also.
For now, I also decided to move the timings a little, editing how long each shot is held for. I did this with the flash-forward so there's no longer the flash of light in the middle as my character walks across the scene. This was several mini adjustments that just benefitted the timing of the overall piece a little. I feel this is the thing I will be adjusting a lot, it would have its major edits when doing audio.

rough cut of my film so far
So far, I think the film is going mostly how I planned. I am happy with timings and what I have been able to do with the different shots so far, however I do wish I would've done many more takes when filming to use different pieces of footage more, as I would have more control over the focus issues and scenes if they didn't flow as well as I hoped. However a lot more tiny adjustments are being made then I thought. Without any visuals or any audio it's hard to know how much refining is left. However for now this is headed in the right direction for me.
Energy ball and lighting
The effect I wanted to do next was the energy ball and the lighting that was produced from that energy ball, this also includes the explosion I want to make happen. I was going in blindly on how to do the lighting and explosion however want to try and recreate the ball that I had made in my experimental research. I decided to start with the first pieces of lighting.

The first shot I did was Gem walking towards the door. Doing this allowed me to cover all bases when doing the lighting so I didn't face as many issues doing the rest. For this, I decided it needed to appear directionally, as if the ball was outside. I added a solid and coloured it using curves, this was then feathered and before I created the mask for around the door, I had some masking to do as you could see me in the reflection, flicking the light on and off, I made a mask around the inside of the door where I was not stood, flipping this and feathering it to mask out myself in the reflection, this didn't have to be perfect as it's a small detail however it worked well. I then created the mask, keyframing it to match with the camera movements, I had to overlap this slightly due to the feathering.
The biggest problem I encountered here was getting a nice faded edge to the mask where it meets the door. I went back a lot to try and make each frame flow nicely as there was a large blue segment and jump between each frame, this made the mask look unnatural and fake. This was very time and consuming and yet in the end I still feel slightly like the mask doesn't perfectly outline the door in certain places. One of the problems with this was that there wasn't enough path points so that I could outline the handle of the patio door properly. This process of making the solid then keyframing it was pretty similar for the rest of the shots with some differences.
In this shot, the only difference was that I had two different kind of light sources. The first was the more faded one through the glass and the stronger one which comes through as my character opens up the door. For this I layered the one outside to create a deeper, stronger light. I also added the turbulent displace and noise like the one above.


For the shots outside, just having the glowing light didn't feel right. Therefore for these shots, I layered the glow and then wanted some movement. I added both turbulent displace and turbulent noise to give and texture to it. I used the small bumps one instead of the usual displacement as it looked more like air. I then keyframed the evolution so it move throughout the shot.
Overall I was happy with how the lighting turned out, the the right is the lighting I've done so far. However I do feel some of the edges of the lights were still a little all over the place. Also doing this has made me realise how I should've and it would've looked a lot better if I had used the strobe light when she is coming through the door as well, this would have made post easier. This is because my character would have been lit up and I would have been able to see the reflections in the glass so I could have edited this more realistically.
The next thing for me to do was including the energy ball, however this also had some lighting shots in it as well. Therefore as the energy ball had been shown I felt editing this would be a little different to before just doing lighting.
In my experimental research, I was really proud of the energy ball I was able to create. So much so that the plan was try to replicate that exactly, however this would have been a big time waster so instead I learnt a method which meant I could paste the energy ball across all my shots. This saved an immense amount of time and is something I will be doing with the stones also. Not only does it save time but it means in each shot the asset isn't consistently changing and harder to replicate.
energy ball from my experimental research

These first 5 screengrabs show me just experimenting with the best way to do these shots. I first off tried seeing is this worked better with a stabilizer but later found it not to be as visual good as the original footage. Therefore I just tracked the glass ball and parented it to the energy ball. I then messed around with lighting as due to it being night the ball was darker. I added an overall blue light and tried with lights closer to the ball. I went with an oval like light which had the wiggle expression to add to the movement of light in the ball. I also had a slightly darker blue under the energy ball in this shot.
The shot below was a moving shot of my character walking towards the energy ball. This video changes perspective so it was a challenge to know how to edit this. However in the end I came to a fairly simple solution. I positioned the energy ball asset in the corner and keyframed this so it came into the corner of the shot as the camera pans round, along with a flickering light around the energy ball. I then added the main light with a solid and feathered a mask shape a little so the light appears to cut off at the corner and cover the screen fully as the character moves in. This helps create the perspective of my character walking through the light.


This shot was generally the same as the last with regards to the two lighting layers and the wiggle expression. However I needed to create a mask so that the characters foot didn't go behind the light as I want the light to feel as if it's on the ground. This was a small amount of time and is barely noticeable but adds to the effect.


After doing this a few times, I found it easy going in and adding in the energy ball, lights and any other adjustments. I was able to do this quickly after troubleshooting any reoccurring issues. In the shot where she is grabbing the ball I had to create a mask for her hand so the energy ball could sit behind it which is slightly different from the other shots I had to do. However the final shots didn't take too long as it was a repetitive process.
The final shot was the ball 'exploding' when my character tries to grab it. I was unsure how to do this so I started with the energy ball. I completed the lighting and then created a mask so the the hand can go over the energy ball. I then scaled the energy ball up after she touches the ball, keyframing it so that it expands quite quickly. I felt this wasn't enough so I went on Actionvfx and found a spell effect which had a blue light exploding. I downloaded the best fit one and scaled this up so create the better explosion effect. I had this explode into the camera and had the solid that I had used to create the light get less opaque and eventually cover the screen. I was happy with but when jumping into after effects it felt too quick. Therefore, I kept the grabbing of the ball the same speed but slowed down the explosion to 150%. This looked a lot better to me.

completed lighting and energy ball
Overall I am quite happy with how this has turned out. I feel the end of this scene is better as I have used more effects to make it look realistic. I think this is because I have had more time and more experience in messing around with lighting. I particularly like the shots with the hand over the energy ball and feel the explosion at the end has taken a simple vfx shot and made into something new which I am quite proud of. I especially like how I slowed this down.
portal
When editing, I wanted to try and complete the visuals I wasn't sure on how I would do first, therefore I came to the portal next. This is because I was unsure how I would bring the portal in and how it would fade out of the scene, also the footage wasn't what I expected to capture so making it flow would be another concern. Below is my final export of how the portal looks.
The original footage
First of all, I created my portal. This was quite simple as I had practiced this before. I added a new solid and used the ellipse tool to create the shape, producing a black oval that will be the inside of my portal. I positioned this using a 3D layer and then duplicated the solid. To the second solid I added a saber effect and changed it to layer mask so that an orange saber effect outlined the oval I had created. I then changed the effect to energize and it created a moving, glowing effect around the black shape. With this, I duplicated the original footage and used it to create a mask of Gemma so she could run in front of the portal, this took a long time as I wanted an accurate mask, however also had trouble with after effects crashing. I think this was to do with how many points I had on the mask. After I had done this, I then added in the environmental lighting on the ground. To do this, I created a solid and selected the colour my portal already was on the outline to get the right shade of blue. I then used the pen tool to create a mask that went around the ground the shape I wanted it to. I put this under the portal and mask for the portal. I then duplicated the original footage, taking the end where there is nobody in shot anymore and put this as Gemma goes into the portal so you don't see her run off shot. I then messed around with keyframing the portal in and out of the scene. I first scaled the portal and then decided to fade it a little as well. I had the blue rim disappear first and then the centre. The light also disappeared a little before the portal had completely gone, so the timings were slightly different for each. I then decided I would have Gemma disappear into the portal rather then just disappear without fade. I feel this effect was then to the standard I wanted it to be. I just messed around with timings a little, thinking about what the audio would sound like in my head.

Overall, I am happy with this effect. My main concerns were how to make the portal appear and disappear, however I think with a mix between the scaling and the opacity, it works really well, particularly when fading my character as well as this makes it appear as if the portal is pulling them in. I am happy with this effect however am eagerly awaiting the audio as I feel that it was what will really sell the effect. However this is just like with most of the visuals I am creating at the moment.
superhero landing
I knew the superhero landing would take a while and produce challenges I was unsure of and would have to troubleshoot, therefore in order to prevent running out of time for this I wanted to get this done. I had many shots from filming and was actually quite excited to put this together. I didn't follow a tutorial as I had remembered how I did this in my experimental research and wanted to put my own spin on it. Therefore I only referred back to one tutorial. Below is the superhero landing in my film.
First off, creating this effect consisted of putting together my footage. This included cutting the clip of my character jumping and landing and the clip of the phone pointing up to the sky. I got the cut perfect, however noticed the skateboard changes. This is because I recorded the skateboard falling over before recording the phone shooting up to the sky. Therefore I took a shot from recording the skateboard falling over and created a mask of the skateboard still, I had to keyframe this to fit the video shooting down from the sky and add a little feather in case it was slightly off at any point. Furthermore, I needed to create another mask as there was a shadow of me about to push the board you could see through the feather effect. This was a simple layer that worked quite well. This fixed the issue with the skateboard already being fallen over.


After I had sorted the skateboard issue, I felt getting the first sections elements sorted would be best. Therefore I inserted the energy ball vfx, using the same one from my experimental research as I felt it looked best, I keyframed this as tracking it was too janky, particularly at the end. I then created two masks for the edge of the clouds so that the energy ball felt embedded into the scene. I struggled getting the clouds to line up for some reason so a lot of time was spent here trying to get the right feather and the best mask path. This was simple but effective, I then keyframed this to stay in place when the camera shot down.
The next thing I did was adding in the crack on the ground, once again I also used the footage from my experimental research. I put in the element and keyed out the green screen, switching the key to hue to eliminate any outline. I then changed the blending mode to overlay and positioned the ground crack just after my characters foot touches the ground. I had to freeze it on the last frame as the effect did just cut off at the end.


The next part was by far the longest part yet most important and in some ways most simplistic. I needed to create a mask around my character as the ground effect was over the feet of Gemma. I needed to mask for the beginning anyway so I thought I would create a mask for the whole way through so I wasn't fiddling around with a mask every time I created an effect. This was a lot more practical and easier. Although very repetitive I was glad and thankful once it was done. This consisted of creating a general mask and using the mask path to go through each frame.
I then started to do the background effects, this included creating a mask around whatever effect I was putting into the film then going through each frame and editing the mask path to fit the effect. I would then adjust the feather to make sure it flows nicely in the scene. I did this for both the skateboard and branch effect. I tried doing this with some background branches however the contrast was too different for this to work well.

Next, I added in the dust. I first experimented with the dust on the ground but it wasn't blending well and didn't feel natural, therefore I ended up layered the same clip of a finer dust across the front of the screen, this was enough to portray that feel and working a treat. I then pre-comped my footage after fiddling around with the actual drop, making sure my character was in the sky for longer. I then learnt about expressions and camera movements.


I watched this video about keyframing the wiggle expression. It showed how to make the expression more or less intense in one clip and about using the other transform tools to add to the effect. With this I was able to create a bigger camera movement when the ground gets hit and calm it down again. I was very happy with this as the one thing I made sure I did was film a wider shot so I could play around with the camera positions more. I am really happy with how this turned out and the last thing was just to export this.
Overall, I am extremely happy with how this superhero landing turned out. I feel it is a lot more professional then my experimental research one and feels a lot less forced, as I only used some effects in the last one for the sake of them being there. However this was a significant task, mainly down to the amount of masking I had to do. I also did face a few problems throughout this such as clouds not lining up, my characters mask overlapping and being slightly in front of the original footage and the inability to use all the effects I had filmed or wanted to use. However I do feel this effect was worth it, I especially like the artificial camera movements and wiggle expression.
neon sign
This effect was a smaller one that was quite different to all visuals I have done so far, therefore as I hadn't done this before I wanted to tackle this one. I didn't want to spend too long here as this is not an essential effect however something I want to try learning. Below is how it turned out.
This was a tutorial I found to show me how to create a neon like sign. It wasn't exactly the look I was going for however I could independently adjust this. I followed this tutorial and quickly had a neon sign I was quite happy with.

I started with this red like background and a few layers of my neon sign. This was just a text layer with the font I felt most appropriate over it. This felt mysterious and slightly gory like. I used the bevel and embed tool here for the first time on a few layers. This gave it a smoother look and felt as if it was stuck to the solid behind it.
This process was actually quite simple when just following the instructions and numbers the tutorial gives. I added glow effects and made several layers of the text to create a textured look. I also added a black solid in the background to create the black back. After I had the general neon look using the glow effects and features, I then keyframed my sign to flicker, this is where I went independent from the tutorial as I wanted my own kind of flicker on and off. I keyframed all the layers of text aside from the last which gave the look that the sign was off. I then added in the blood splatter which I had found on actionvfx. I timed this so the sign appeared as the blood splattered. I felt this looked good so I exported the clip and then put this into my premiere edit. The only thing I had to do here was use the freeze last frame to hold the off sign a little.

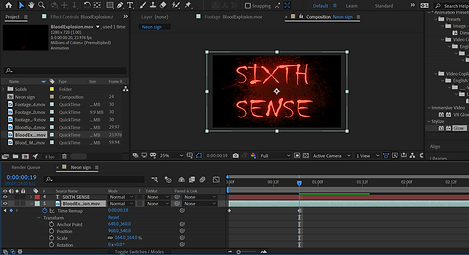
Overall I am really happy with how this sign turned out. I think it has the effect I want it to and links well to the end of the short film. For my first neon sign graphic I think this has gone really well. Next time however I would want to see if I could make this more realistic and maybe animate one of the letters falling.
Adding the stone's on the characters arms
I had two big effects left to do, this was the stones on the arms of my characters along with the force lightning they produce in the final scene. I went with doing the stone effects first as this was chronologically coming up first in the film.

My first idea was to create the stone on a solid, a textured like stone and then track the mask shape to the arm using a 3D layer and keyframing the stone. Therefore, I first created the look I wanted. I did this using a blue solid, using the pen tool to create the right shape to the arm and then using turbulent noise to create a texture I wanted. I spent a long time messing around with the glow effect and color offset. This meant I could manipulate my stone more easily. I gave my mask the appropriate feather and then started using the tracking markers to track where my stone would go, however this didn't work very well as it struggled to follow the perspective and was very out of place.
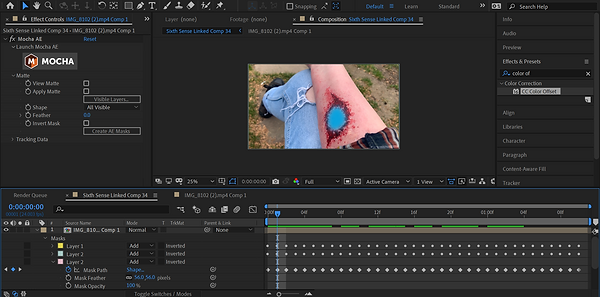
Therefore I tried keyframing the stone in place with the mask path, position and 3D layer. I spent a long time trying to adjust and do this, making lots of keyframes and jumping between frames. However I couldn't seem to get this to work. I was very unhappy with how janky and un-natural it felt. Therefore I had to find other solutions. After getting advice from my tutor we decided it be worth tackling a more advanced tracking system called Mocha. This would hopefully be a smoother tracking systems but will also be a useful skill to know for the future.

Tutorial I followed when learning Mocha AE
I found actually using Mocha quite simple and effective. I started by masking out the sleeve as it pulled up and then used the tool in Mocha to create the shape of the stone I wanted on her arm. After getting Mocha to track this spot forward, I reviewed the path it created and it was extremely smooth. I was very happy with the track it had created. I applied the four corner pins to the corners of the cross, I tracked this and then saved the whole Mocha effect which a track I was happy with. I was happy with how this was going but this is when I struck my problem. I went back into my After effects comp and after selecting the solid with my stone on and clicking to export the track, my solid just seemed to disappear. I went through looking at my settings, trying to evaluate the problem. I went through websites and looked at videos trying to find why my solid wasn't accepting the track data from Mocha (to the left are some of the things I looked at) I tried unlinking it to the Premiere file and then went into 'Matte' and created a mask from the track data. At first this was a small thing to try and find another solution. However, after jumping on calls with my tutor we were able to make the mask see through into the back of the footage, so a black path followed the mask track. This was showing the tracking data was working. I then got on call with an ex-student who was able to get the stone I created to the back. We realised this didn't work as the mask looked trough to the stone therefore the stone was moving inside. I didn't like this look so I ended up using a flat colour and feathering this for each of the stones.

The stones ended up being a flat colour with a glow and a feather on the mask. This wasn't originally how I wanted my stones however I couldn't get the texture I wanted due to the way I had to create the stones. However I was able to blend them in well. I did this for the red stones as well, just adding a red solid colour instead of the blue like the stone on Gemma's arm. I then repeated the mocha process for all shots, having to keyframe a little for some of the more difficult shots.

Overall, I am somewhat happy with the outcome of the stone. Whilst this was not what I particularly wanted this to look like, I feel the complete colour does do what I want it to do. I like how it feathers out into the skin and the tracking in most of the scenes. I would have wanted a more textured stone however the problem with the tracking made this difficult to do. In conclusion, I am happy with how the stones have turned out, without the texture sometimes the stones feel too fictional. However I feel these stones resemble what I want them too, with the blue looking better then the red stones in my opinion.
lightning
Lightning is a big part of the last scene in my film, however there was one small element in the middle where Gemma realises something is wrong with her arm. Therefore I got this small piece of lightning done before doing the rest. Below is the exported version of this clip.

Doing this effect did not take too long as I've done this before in my experimental research. I took the lightning shots I had used last time, scaling, rotating, positioning and keyframing them in random positions. I then created a solid and used a feathered ellipse mask. I created the blue colour using the eyedropper tool, I then duplicated this dot to each lightning frame and keyframed the dots to stay at the end of each lightning bolt. I did this for every lightning bolt. I then pre-comped this and added a blue light flicker by keyframing the opacity.
Overall, I am not particularly pleased with how this came out. I feel the lightning doesn't feel particularly embedded and present in the scene. I feel if I knew how to colour correction better this could feel more present. Furthermore if I had more time I would also add in some more detailed shadows under each lightning bolt. I feel I could mess around and try and improve this shot further as I am not completely happy with this.
Force lightning
This took me to the final scene, and the biggest effect I needed to do of all. I had some experience doing force lightning in the past, but remember it messing up when coming to light it. There was many different perspectives of this lightning which was my biggest worry, however I am extremely happy with the end result. In my opinion this being the best scene in the film. Below is an export of the scene of force lightning and how I did it.
Three months ago, I tried out the exact tutorial when messing around in after effects and this is the result I got. From this I knew I'd need to figure out the problem with colouring the lightning and some environmental effects. This was a basic but good starting point for the force lightning.
I used Will Carmack's tutorial to learn how to do this effect
I had no plan here other than going through and doing each of the shots that needed lightning in order. Therefore I was able to start on a more simple shot of Gemma shooting lightning at the figure. This went fairly smoothly, I was able to figure out the colour by going to my project settings and changing the bit depth to 32. My process on these shots began by tracking each figure with a null object, getting a solid and adding glow and curves to create the right light colour and then duplicating these and positioning them in place. I then keyframed the conductivity state so that the lightning would have a current. After these were in place I created a new white solid and used the ellipse tool and gaussian blur to create a small spot that looked like it was glowing. I connected these to the tracking on each finger after duplicating the spot 5 times, these went behind the lightning. I then created the environmental lightning, I had done this a lot before so was happy to do this. I created the correct colour solid (either red or blue) and turned the opacity down, usually to around 20/30%. I then created a mask randomly around where the light would be strongest. I feathered this mask and used the wiggle expression on the light so that it would flicker. Next, I did an adjustment layer to show the movement heat would have on particles. This was probably the one thing that made this effect look as good as it does, thinking about physics of effects is something I tend to forget but having the slight movement here really proved effective and realistic. Therefore, I added turbulent displace to this layer and added a wiggle expression a lot less then the light. I changed the amount to 10 to give a subtle effect and created a mask around the lightning and things close to the lightning, I feathered this and then my effect was done. This was the main process for completing my shots, however every shot had it's differences but this was the general structure I followed/ how I executed the main lightning effect.


I had quite a few shots of just faces, for these I just made a mask of the correct colour solid around the face of the character and then feathered this adding the wiggle expression. In some shots if the lightning felt closer to the face then I would also add a layer of displacement.
The biggest challenge I faced was when the lightning meets. I didn't exactly know how to create this illusion. Therefore, I put in all the lightning coming from the hands of each character, making them meet in the middle. I tried various things for the middle section but eventually came out with this. I took three free VFX elements from Actionvfx and layered them on top of each other, slightly adjusting the position of each. As this footage was really short, I duplicated the sequence over and over till I had them all in a row in a pre-comp playing one after the other. I positioned this in the middle and put the lightning underneath it. This made a good energy explosion in the centre. I then added in the adjustment layer for the heat distortion and all the lights, including one for the asset in the centre. I made this asset white as the actual lightning between the glow is white. I pre-comped all this together and added a wiggle effect onto the whole clip to create the effect that the lightning is effecting everything going on around it. I did the same process of the standing in shot however just had to pay more attention to where the lightning was coming from and the light source. This clip took a long time to figure out but is possibly in my opinion the best effect in the film. I am really proud of this.

I used the assets from the above effects to show Gemma switching off the lightning to duck and strike again. I learnt how to do this with the energy ball which actually proved very useful. All I had to do her was fade things in and out so they disappear just after Gemma's force lightning stops. I then also had to keyframe the origin of the lightning so that it slowly fades away, this worked very well, lining up perfectly with the shot before.


To do this small hit to the hand, I simply keyframed the lightning coming towards the hand, adjusting them so they came from different directions. I then used the effect I used for the lightning meeting and used the curves and hue to adjust this to a red colour. I then did the lightning and turbulent displace, keyframing everything to fade and the effect was done.
Overall, I am extremely happy with the look of the lightning. I feel every layer that goes into this effect adds something new and effective to make this look realistic. On the other hand, I do feel the timing may be a little too fast in places however I think once I do audio I'll be able to adjust this. In conclusion, I am very happy with how this turned out.
VISUALS FINISHED EXPORT
I am quite happy with how this export has turned out. I definitely have favourite parts but overall looking at this I am quite happy. I now need to complete the audio. With that I feel the timing will fall into place as well. I am confident that I have enough time to make this emotional with the audio. There are some spots I look at and feel are at a lower standard, however I know what to do next time.
Audio
When doing sound design in the past I have always struggled to get the right kind of atmosphere and feel to my piece. However laying down the main foundations for the room we are in and then going in with the next effects, building up from there in a chronological fashion. Below is what I did to create this sound track.
.jpeg)
The first thing I did was gather together the main sound effects for my film, these are the ones I saw looking at my audio-list I had created. This was done through both foley, freesound.org and SFX I had found posted on YouTube. The main effects concluded of any ambience and main effects such as the stairs creaking which would be hard to match with already made sound effects.
.jpeg)
Firstly, I put in the ambience for each scene and then the dialogue. I had recorded the speech after filming so therefore used the audio in the actual recording on a muted track to help with the placement of the other dialogue. I then went through adding the sound effects chronologically. It's hard to say any method to this as it is just what felt right when doing it and hearing what it was like in the moment. I found great use in volume level, making everything sound like it's in that room. Furthermore, I also ended up using the exponential fade a lot to smoothen out my audio, I even got to experiment with a bit of echo and reverb when messing around with Max reading out her text in Gemma's head. I feel this was a good effect. I struggled most with the flash-forward as I ended up making it too full however after a chat with my tutor releasing that with some background music and a more simplistic ticking of the clocks this could work better. Something still doesn't feel right with this but I think it worked okay.

.jpeg)
The biggest turning point for me was when my tutor mentioned about creating even the slightest music track behind my film. I was nervous about this as I have never put music behind a film before, however after creating a simple mysterious musical sequence for the beginning, I found having music behind this an asset to the film. Further from this it also helped in areas I was unsure of what to do. I had fun playing around with making the music more intense. There is only one section of music that I filmed however I like how I played this through the beginning and at the end making this cyclical, showing there's always been this strain between them.
Overall, I am quite happy with how the sound track turned out. I was quite nervous of how to do this and towards the beginning felt it would be difficult to portray what I heard in my head when doing the visuals for this film. Despite this being very different to my original vison I like how it works. My biggest struggle was the flash forward and also finding more unusual noises such as the energy ball, these ended up being many layers of sound effects to get the right noise. My proudest part of this is the end scene. I feel this is because finding out that the simple music works well was a big turning point, and here I was able to create a cyclical film and bring the music back to what it was at the start whilst blending it with more intense tracks. In conclusion, considering my abilities, I am proud of what I have achieved with audio. The full, finished film can be found on my home screen.
